Finally, a new post! I'm sorry about the hiatus. Not to worry, though, I'm back with a few projects I did during my absence.
This project is called a "wood gasifier camping stove". It's a portable, homemade stove, of the gasifier type. This means, that the thing you're heating is heated by hot gas that's created by the burning of a fuel source, in this case it's wood.
You'll need two food cans, one larger than the other. I used an empty ravioli can and a large can that held either peaches or pie filling. You need to keep the lid to the larger can and remove it with a safety can opener if you have one. If not, use a regular can opener sideways. The top rim needs to stay in tact.
As far as tools, I did mine without anything electric, but if you have a drill, it'll make things a whole lot easier. I used a piercing type can opener (sometimes called a church key), an awl (kinda like an icepick), tin snips, pliers, and a grinding stone.
Monday, July 23, 2012
Portable Wood Gasifier Camping Stove
Labels:
Crafts,
Functional
Monday, June 4, 2012
Framed Sunglasses Rack
I made a display for my sunglasses that hangs on the wall. It's artistic and functional, keeps them all in one spot, keeps them from getting knocked around and scratched up, and looks pretty nifty, too. I used the same idea as the framed note board a few posts ago, but added one key feature: an elastic band. I got this idea from a few blogs around the internet and kinda combined a couple different styles. Some used wire instead of elastic, some used an antique frame, most didn't keep the glass, some didn't even use any backing on the frame at all. I decided to keep the glass as I think it lend to a more "finished" or professional looking piece. If you have trouble with it (you'll find out why soon enough), feel free to scrap it and use it for some other project.
This project is a simple modification to the aforementioned marker board. Follow the directions to that project until you're about to put the wrapped back board back into the frame. Instead, cut the length of elastic that you think is appropriate. Your length depends on the size of your glass and frame, the thickness of your elastic, and desired tautness. It shouldn't be so taut that it's strained or the inner threads are very visible, but not so loose that it hangs or will arc under the weight of your sunglasses. I actually could've probably stretched it a smidgen more.
Center it between the glass and the frame so that when the glasses are on the elastic, they'll sit just in the middle, about one third of the way down in my case. When you have the desired location and tautness, tape the ends to the edge of the frame so you can press all the layers in on top of it and adjust them as necessary without having to redo your elastic.
Gently press the glass down around the edges, to make sure there aren't big gaps, and place the backing into the frame. Press around the edges gently as well, to get a tight as fit as possible. This will be tricky. With these additional materials being wrapped around the backing, it probably won't fit, but don't force it too hard. Just do your best. Remove the tape from the elastic and re-tape it to the backing, keeping the tautness in tact. Tape the back board into place when your satisfied with everything (just like with the note board).
Turn the whole thing over and admire your handiwork! Now you can mount it to your wall location of choice. I used a couple of poster mounting strips, like the kind on the back of removable wall hooks. They're right next to each other at the store, made by the same people.
Load up your sunglasses collection and you have a functional, conversation starting art piece!
Labels:
Crafts,
Functional
Wednesday, May 30, 2012
Water Bottle Greenhouses
Indoor gardening idea:
Instead of using seed starters and transferring the baby plant to
your planter or garden, plant the seeds directly in your planter. Cut
clear water or juice bottles a few inches from the bottom and place it over where you planted your seeds. Gently press into the dirt. Voila! Individual greenhouses until plants are big and strong enough to live without them.
Labels:
Functional
Monday, May 28, 2012
Framed Fabric Note Board (Marker Board)
http://pinterest.com/pin/39476934204131150/ |
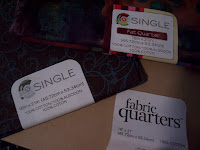
The blog that pin links to uses patterned decorative paper, which is going to be easier than my method. I decided to use fabric. My reasons being that I don't have patterned decorative paper laying around because it's expensive and I don't scrapbook. Plus, my frame is bigger than standard sheets of paper and I like the look of fabric better. I do happen to have a bunch of thin cotton fabric quarters. Whenever I go to Joanne's, even Walmart, I pickup a couple quarters, sometimes called, "Fat Quarters". They're only $0.99 at Walmart, less than 2 bucks at Joanne's. Keep in mind when choosing fabric that the design isn't so busy that you won't be able to easily read your notes.
If you do the easy method, simply find paper you like that's big enough for your frame and put it in. If not, you'll need a frame large enough for your purposes, thin fabric, scissors, fray check, dry erase markers, and pencil and masking tape (not pictured). The beauty of using masking tape instead of glue, or duct tape, is that if you want to change your fabric out, it's easy and damage free.
Labels:
Crafts,
Functional
Thursday, May 17, 2012
Crazy Eggs
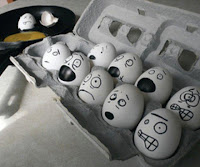
I wouldn't really classify this as a craft or do-it-yourself project. Just something to make you smile whenever you open the fridge or to do if you're super bored. I saw the internet meme to the right quite a while back and while my roommate was out of town a few weeks ago, decided I had to do my own version and surprise her.
It's super simple, just grab a sharpie and go to town! It took a few sessions because they'd build condensation after a few minutes and marker doesn't work on wet surfaces, duh. Anyway, I realize it's a silly thing to do, but it cracked me up at the time.
Here are my results:
Wednesday, May 16, 2012
Homemade Pop Tarts #2 / Homemade Hot Pockets
So, a while back I posted an entry about making pop-tart like pastries at home. I liked how they turned out for the most part, except I grabbed the wrong measuring spoon for the salt content in the crust... not so good. Not too long ago, I tried again, without so much making everything from scratch. At the same time, I decided to use the same method to make homemade pizza pockets. It was a bit experimental, so I only made two of each, in two different sizes.
It's super simple. Instead of making pastry crust, you open a can of ready-made crescent rolls, or croissants. Press two of the triangles together to get a rectangle and roll them out with a rolling pin to make them a bit bigger. Paint an egg wash all over the top of the pastry
For fruit filling, simply spread jam around the middle, leaving an edge. I think I did a layer of peach jelly and a layer of applesauce, 'cause I'm wild like that.
For pizza filling, spread with pasta sauce, leaving an edge. On half, top with cheese and your favorite toppings. I did olives, bacon, turkey, and artichoke hearts.
Wet your finger and moisten the clean edges, fold pastry over to cover, and press all edges to seal. (A fork dipped in flour works well). Brush the tops with egg wash. I also sprinkled cheese on the pizza pastries. Use a sharp knife or fork to poke holes in the top for ventilation.
Stick them in the oven (on a baking sheet lined with parchment paper) according to the temp on the croissant package, for the time stated, or until golden brown. This. picture is really light, they're a touch darker than it looks.
These are best served warm, but can be stored in a zip-lock baggie or Tupperware in the fridge for a few days.
I enjoyed these. The taste and textures were both delicious. They aren't as hold-in-your-hand friendly as the store bought versions, but tastier and not chocked full of preservatives. Enjoy!
Labels:
Fun Food,
Functional
Wednesday, May 2, 2012
Vinyl Record Bowl
For quite a while, I've had some old records that I had intended to make into bowls. Well, I finally did the project, but couldn't find the original tutorial that I had seen way back when. When I went to do this the other day, I found two different tutorials online, using two different methods. I mostly used the baking method but with some of the shaping aspects of the boiling water method. Which is, to shape my first bowl (first two pictures) I pressed the record between two mixing bowls. I also used a sauce pan to shape my second bowl (third picture), so it would turn out more like a tray style bowl.
I like how they turned out. I'm actually using the first bowl to hold fruit in my kitchen, and the second on a side table to hold snacks. The links to find out how to do it are at the bottom.
Links:
Baking: http://diyfashion.about.com/od/diyaccessories/ss/Record_bowl.htm
Boiling: www.skullsandponies.com/2012/03/how-to-make-bowl-from-vinyl-record.html
Labels:
Crafts,
Functional
Saturday, April 28, 2012
Crochet Amigurumi Elephant
I crocheted a little amigurumi elephant this week. Not too much to say about it. I used a ball of leftover teal, but realized I was going to run out. So I shortened the legs and used a different color for the soles of the feet. I wasn't sure if I liked it or not when finished, but he's grown on me. When I do little animals, or anything with eyes, I typically don't buy the little plastic ones they tell you to in the pattern and will just sew them from black yarn. Needless to say, the result is usually quite different than the pictures. It's a pretty quick project and can be done in a matter of hours. I don't have a link to the pattern because I did it from a book called "Easy Crochet Critters" from Vanna's Choice brand yarn. I included a pic of the cover at the bottom.
Labels:
Crochet
Simple Bag Clips: Part 2
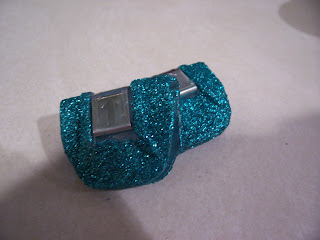
After putting up the post about using store hangers for bag clips, I decided to figure out something to do to them so that they didn't look expressly like the ends of hangers, or at least jazz them up a bit. So, I added something completely unnecessary: Glitter!
The one thing that I didn't do, that I'd tell you to, is to sand the plastic with medium to fine grit sandpaper. The plastic is smooth and I'm not sure how long the glue will stick without roughing it up for grip.
The directions are simple. Sand the plastic enough to lightly rough up the surface. Paint it with glue (outer, plastic area). Martha Stewart has a glue specifically for glitter, but craft glue, regular white glue, or Modpodge would all work.
Holding it over a piece of paper or paper towel, sprinkle fine glitter over the surface to cover it. Let it dry. Lightly shake off excess over paper and paint another layer of glue over any bald spots. Let dry and gently shake off excess. Tape the metal parts to protect the shine from the sealer. Take them outside and spray with acrylic sealant. Let dry. Take back outside for another coat of sealer and let dry.
To dry, I would open the clips and hang them from the paint brush or other dowel between two things of equal height, like cans from your pantry.
It might be silly, but a little frill can be pretty fun and make a load of difference. Enjoy!
Labels:
Crafts,
Functional
Wednesday, April 25, 2012
Simple Bag Clips
This is the simplest thing in the world to do. Make bag clips out of store hangers. I basically saw this on Pinterest and decided to do it, although, I added a step.
When snapping off the end, try not to do it right next to the clip, so that it doesn't crack and so that you get the whole clip off.
Then, I trimmed the edge with shears, or tin snips if you have them, so that it's a fairly straight edge.
When snapping off the end, try not to do it right next to the clip, so that it doesn't crack and so that you get the whole clip off.
Then, I trimmed the edge with shears, or tin snips if you have them, so that it's a fairly straight edge.
Labels:
Crafts,
Functional
Tardis Travel Tissue Case
This project is just a variation on this post about making a travel tissue case. For all you Doctor Who fans, this is for you. It's a Tardis themed travel tissue case that's bigger on the inside!* The instructions I used came from this interesting blog, but as stated in my previous post on the subject, you can easily find others online by doing a simple search.
I obviously made a few changes. For starters, I used blue felt instead of cotton fabric and interweaving. I small sheet of felt costs between twenty-five cents and a dollar at craft stores. I used simple linen for the interior and "lantern" tag (instead of buying white ribbon). Next time, I think I'll adjust the size so that the case isn't as wide. It's a bit roomier than you really need, plus you won't have to see the extra space on either side of the Police Box.
For the Tardis, I found an image online, re-sized it to meet my needs, and printed it on fabric transfer paper. If you chose to do this project, print the image on regular paper first to make sure the sizing is correct. Many Photoshop-type programs only re-size images based on pixels, not by inches or centimeters. It took me four or fives times to get it right.
Because I'm not an expert seamstress, my case opening wasn't as straight as I'd like, despite my best efforts. So, my Tardis door and the case opening didn't line up perfectly.
I lined up the Tardis on my case and cut it in half accordingly. Then, just followed the directions on the transfer paper package.
Now, you're set! Just fill with travel tissues and smile when you tell people it's bigger on the inside.*
*Not actually bigger on the inside. It's a reference joke.
Links:
http://verypurpleperson.com/2010/02/tissue-case-tutorial.html
http://thisthatandawesome.blogspot.com/2012/03/travel-tissue-case.html
Labels:
Crafts,
Doctor Who,
Functional,
Sewing
Saturday, April 21, 2012
Elastic Nook (or book) Strap
For those of you who have purchased a Nook in the last few years, you have probably seen those elastic straps you can buy to keep your cover closed. They come in several colors, are pretty handy, but are pretty expensive for a simple piece of elastic.
A couple of yards of colored elastic only costs a couple of dollars. I got 1inch wide because they didn't have a colored variety in a smaller size. I recommend going to a fabric store, like Joanne's, rather than a craft store, as they'll have a better selection.
Labels:
Crafts,
Functional,
Sewing
Tuesday, April 3, 2012
Fun Food: Crazy Cupcakes
It turns out that an odd trait my sisters and I have inherited from our father, apparently, is an insatiable desire to try and make food, specifically deserts, just a bit more "fun". Growing up, we used to roll our eyes and laugh about some of the things he did, like the multicolored, polka-dotted birthday cake, among other things. As it turns out, we seem to have grown into the idea. After all, life is too short for boring food. A cake in October? Decorate it like a pumpkin. Waffles? A batch in pink and a batch in purple, please. Plain white frosting? So blasé. A bit of food coloring to your favorite recipe can change everything. It puts me in a better mood almost every time.
Here are a couple batches of cupcakes made at my house. The first batch was done a few months ago. I feel that they're quite whimsical as light teal with purple polka dots. These, by the way, are carrot with cream cheese frosting.
My sister made these spice cake cupcakes yesterday. She actually mixed cream cheese frosting with regular frosting for these and colored it, at my suggestion, blue and orange with swirls! So fun. Afterward, I was looking at them and realized that there were a few sports teams with those colors, though the shades would need to be darker, that wasn't my intention.
There's actually quite a variety these days as far as food coloring goes. Along with the standard four pack droplet bottles in classic colors, you can get other colors you don't have to mix yourself. There's even neon and gel versions (not as messy). Try it yourself and go wild!
Labels:
Fun Food
Monday, March 26, 2012
Random Awesome: Batman gloves
This is for any fans of the old-school, live-action Batman TV series. I found these nifty fingerless gloves on Geek Crafts. It's actually a knitting pattern, for any knitters out there, on Ravelry.com. I, personally, don't knit; but they're fun, nonetheless.
Labels:
Random,
Superheros
Saturday, March 24, 2012
Homemade Moisturizing Soap
There are countless variations and recipes for making your own soap. There are also more than plenty tutorials online that will take you through the process. I see no reason to spend the time adding one more to the masses. Do a Google search for "soap making tutorial" and you'll see what I mean. I will however show a batch I made recently and give a few points to consider before diving in yourself.
I have very dry skin and live in a cold, dry area; so, I decided to make a batch that was as moisturizing as possible. I took a recipe that apparently got good reviews (called Sherry's Fantastic Soap) and adjusted it to include even more moisturizing ingredients like olive oil, cocoa and shea butters, castor oil, and jojoba oil. (I call it my Fantastic Variation) I also reduced the size of the batch, also. This is actually considered a fairly small batch at only 2.25 pounds, or 36 ounces, whichever you prefer.
Labels:
Crafts,
Functional,
Soap
Thursday, March 22, 2012
Travel Tissue Case
I've done a couple of crafts in the past few weeks and like an idiot forgot about taking pics until I was finished. That's okay, because it's pretty easy to get tutorials and all the info you need to do them online. The first is basically a little pouch to carry a pack of travel tissues in. For those of you who carry them around, you know how beat up the plastic packaging and tissues themselves can get.
This is a pretty simple project, whether you're an avid sewer or not. I was feeling lazy and didn't feel like setting up my sewing machine for something so quick and small, so I did it by hand. Each line I sewed, I double backed on, eliminating gaps, to give the stitching a more even, professional look. Even doing, essentially, twice the amount of stitching, and ironing (very important step!), sewing up a strip of fabric instead of using ribbon, and including an interfacing layer, it took me less than an hour. With a machine, it'll probably take 5-10 minutes.
You can simply Google something similar to "tissue case pattern" and get half a dozen patterns or tutorials on cases like this or other variations. The one I based mine on came from here.
Links:
http://verypurpleperson.com/2010/02/tissue-case-tutorial.html
Labels:
Crafts,
Functional,
Sewing
Tuesday, March 20, 2012
Random Awesome: Doctor Who
I found this YouTube video that made me smile. If you're a Doctor Who fan, especially of the 10th Doctor, you might like this. Watch all the way through, there are some good bits in the middle.
http://youtu.be/3s4Czla6tXc
Labels:
Doctor Who,
Random
Sunday, March 18, 2012
Random Awesome: Wonder Woman Apron
I found this apron on one of my favorite sites and thought it was awesome enough to share. It's perfect for cooking or craft projects.
http://www.thinkgeek.com/clearance/on-sale/e9e3/
Labels:
Random,
Superheros
Tuesday, March 6, 2012
Etched Tile Coasters
So, this is a pretty simple project. You can do pretty much any design you want, as long as your stencil completely seals to the tile. I used the Star Trek stencils I made for the post about "contact paper" stencils a couple of posts back. You can also buy "peel and stick" stencils at craft stores like Michael's that are intended to be used for things like glass etching cream, which is what we'll be using here.
You'll need dark colored ceramic tiles (available at Home Depot type stores), glass etching cream (available at Michael's type stores), appropriate stencils, cork sheeting, strong bonding glue, scissors, and a plastic spreader (not metal or glass) for the cream (I used a plastic, disposable knife).
This is shouldn't be too difficult or time consuming. The longest part for me was actually finishing the stencils, as I couldn't cut the inside parts out until I was ready to use them.
First, lay out your stencil on the tile before peeling the backing off, to get an idea of placement. You don't want to be lifting and replacing it, getting fingerprints all over the adhesive, weakening the seal, etc. Once you like how it'll look, peel the back, stick it on in the appropriate location, and press. You'll want to do an extra rub down around the edges where we'll be placing the cream. It's very easy for it to seep under the edge and ruin the look of the image.
Saturday, March 3, 2012
Homemade Poptarts
Getting ready for work, I don't always have time to eat a proper breakfast. I usually find myself with a glass of juice, an Eggo, and a pop-tart in front of the bathroom mirror while I'm getting ready. While I pride myself in enjoying the whole wheat frozen waffle, pop-tarts are not exactly high on the healthy-meter, nor the scrumptious factor. I decided not too long ago, that that needed to change. My two options were that I could scour the local health food store for a slightly "better for you" option that probably tasted like cardboard (not that the name brand version doesn't) and cost three times as much or make it myself. I realize that the second option isn't necessarily healthier (most of us know all about pastry crusts), however, making it oneself does ensure that you know what all the ingredients are and can pronounce them. This is the option I chose the other day. Unfortunately, I didn't think about taking pictures and posting them until I was done. So I have a couple finished products, the recipes I used, and some tips/hints I learned as I went.
I combined a few different recipes. Most of the ones I found were relatively the same. I also used three different fillings. The first is a fresh fruit filling I found with this recipe, using real strawberries. I recommend trying this; it's really good! It's also one of the very few that called for real fruit, not jam. Another aspect of this recipe that I used was the colored frosting and sprinkles. I wasn't going to dye the frosting or use sprinkles, but I saw them in the spice drawer while looking for vanilla and thought that I'm only young once and life's too short not to have fun baking. Who says I can't be a kid again? I am making pop-tarts, after all.
Labels:
Fun Food
Saturday, February 25, 2012
Still here!
Sorry for the hiatus. I just wanted to post something letting anyone who reads this know that I'm still alive and sorry for not posting anything in a while. I've been pretty sick for a little while and now that I'm starting to feel better, I have a few things in mind for my next few posts. Stay tuned!
Labels:
Blog Related
Saturday, February 11, 2012
Monday, February 6, 2012
Stencils
This is the first of what will probably be several, at least a few, handmade stencils... especially since this tutorial isn't going to be technically complete. I'll explain at the end. You'll see why. What I will describe will work best for hard, non-porous surfaces like glass or ceramic tile. You could use it for fabric, but freezer paper works much better for that... a post for another time.
This type of stencil is handmade from contact paper. Which, if you don't know, is roughly similar to wall paper. Major differences are that this is removable and it isn't used to cover walls. Most people use it to line shelves and drawers. It comes in a variety of colors and textures, including clear. You could use a dark color for stencil-making so that it's easier to see against whatever it is you're stenciling on, but it requires an extra step or two. I got clear for two reasons: one, it was one of the cheapest; and two, even though it has paper backing, you can still see mostly through it unpeeled, which makes for easy tracing.
The first step is to get the images you want to make a stencil out of. This can be a lot trickier than it sounds if you have to make it yourself. You can do a Google image search of the design you're looking for and add "stencil" to the parameters. You will probably get a decent amount of pumpkin carving designs in the batch. However, if you can't find what you're looking for, you might have to Photoshop a black and white version of whatever it is you're doing. There's a lot that goes into that, steps and rules and whatnot. This is a tutorial on someone else's site, on how to do just that. Too much to go into here.
Saturday, February 4, 2012
More Crochet Stuff
I went on a little hiatus from posting so I thought I'd put a couple quick somethings up to satisfy readers while I work on the next few projects. I thought I'd start by sharing a couple of crochet projects I did last year.
The first is a little pumpkin I did before Halloween. The pattern was actually a Jack-O-Lantern, but when I finished the main pumpkin (including the stem and leaf), I decided that I liked it the way it was. My cat agreed. She kept jumping on the shelf I had it on and knocking it down so she could play with it.
Another thing I did before Halloween is a couple of baby bibs for my boss's new baby. I got these patterns at Lion Brand Yarn, like most of my patterns, and there were a lot of characters to choose from. I did the Jack-O-Lanterns because it was so close to Halloween and the froggie because, well, I like frogs and I thought it was cute. Also available were a ducky, owl, piggy, and a whole slew of classic Halloween characters. The frog required embroidering the mouth on and I had never been taught "proper embroidering technique" so I kinda just winged it. I also added an extra round to the pupils but I don't really like the placement of the left eye. Mine looks nothing like the picture on the pattern. Looking at it now, it's a bit freaky looking... oh, well. Still mostly cute.
Pumpkin Amigurumi |
The first is a little pumpkin I did before Halloween. The pattern was actually a Jack-O-Lantern, but when I finished the main pumpkin (including the stem and leaf), I decided that I liked it the way it was. My cat agreed. She kept jumping on the shelf I had it on and knocking it down so she could play with it.
Another thing I did before Halloween is a couple of baby bibs for my boss's new baby. I got these patterns at Lion Brand Yarn, like most of my patterns, and there were a lot of characters to choose from. I did the Jack-O-Lanterns because it was so close to Halloween and the froggie because, well, I like frogs and I thought it was cute. Also available were a ducky, owl, piggy, and a whole slew of classic Halloween characters. The frog required embroidering the mouth on and I had never been taught "proper embroidering technique" so I kinda just winged it. I also added an extra round to the pupils but I don't really like the placement of the left eye. Mine looks nothing like the picture on the pattern. Looking at it now, it's a bit freaky looking... oh, well. Still mostly cute.
Wednesday, January 25, 2012
Clean/Dirty Dishwasher Magnet
This project is a slight variation of the laminate magnets a few posts ago. It's a sign you put on your dishwasher that says whether the dishes are clean or dirty. Now, I've gone a large portion of my life without one, but I think everyone's put dirty dishes into a clean dishwasher, especially if you have roommates. After getting fed up, I knew a sign was in order. You can buy them; I'm cheap and think there are more important things to spend my money on. I tried notes and post-its, but I got tired of wasting paper and post-its. The brilliant idea of making a magnet version came shortly after my first post about refrigerator magnets.
The main difference is that for those magnets I wanted clean edges. For this, I wanted to make sure that it was sealed and no water could get through, but I still didn't want a clear border like you see on laminated documents.
For the image, I looked online for a while but couldn't find one that met my picky tastes so I ended up just making one on my computer to match my roommate's kitchen decor color of choice: Yellow.
Labels:
Crafts,
Functional,
Magnets
Tuesday, January 24, 2012
Randomness
Every so often, I'll post something from another site or blog that I find to be awesome, not necessarily being completely relevant, but cool nonetheless.
This first such entry is from a blog called Geek Crafts, for all you baking Star Trek Fans:
Wednesday, January 18, 2012
Laminate Magnets
This is the first of what will probably be many posts on magnets. I have several ideas on the subject, plus they're really easy to make. First, I'd like to apologize on the quality of the images. Many, if not most, are blurry. My camera is really old and the view screen is extremely small so I couldn't tell that the images weren't focusing when I was taking the pics.
So, what I call laminate magnets are those flat sheet type magnets like advertisement kind stuck to the back of phone books or that some people make business cards with. I've seen some fun ones, as well, and thought that there's a lot of potential to go wild with. I found some images online that I printed out, but you can also use photos that you already have. Photo magnets are a great way to keep those memories visible without having picture frames all over the counters. You could also draw or color your own images and pictures if you're feeling extra creative.
I printed two sheets for this project. One was three "cooks helpers" cards that I downloaded from Martha Stewart with measurement equivalents, pan size conversions, and candy temp. guide. The other was a page of reoccurring alien species from Doctor Who that I found doing Google image searches then re-sized to about 4 inches tall.
You'll need a roll of adhesive magnetic sheeting (available at craft stores), self adhesive laminating sheets (wherever office supplies are sold), scissors, the images you'll use, and a pencil (optional).
Labels:
Crafts,
Doctor Who,
Magnets
Wednesday, January 11, 2012
About This, That, and Awesome
Check out my new "About That" page in the menu tab bar! It's basically a brief "who I am" and "what I'm doing here" for the blog.
Labels:
Blog Related
Late Christmas Crochet
So, I know that it's the New Year and Christmas is considered far behind us; however, don't think it's too late to post the Christmasy things I crocheted "last year". If this gives anyone an idea for next year, there's plenty of time! There isn't too much to say on the subject, but since this is my first post on crocheting, I'll try to expand.
I don't think it's realistic for me to post tutorials on how to actually crochet. I was taught a few years ago by my sister. I was at Thanksgiving with my sisters, parents, grandma, aunt and uncle, cousins, etc. At one point, everyone was gathered in the giant great room doing various things and it turned out that all the women there were knitting or crocheting...except me. I can't say that it was love at "first hook", I've put it down and picked it up sporadically over the years. Almost everything I post that I've crocheted will be from a pattern or a variation of a pattern or chart. If you're inspired and want to learn, you can always find someone who knows how to teach you, but the internet is vast and ever expanding resource.
Cute Amigurumi Reindeer |
The first project is a little amigurumi reindeer that I actually had started in 2010, got most of the way through it and "set it aside" out of frequent frustration. I picked it up again and finished it before Christmas 2011. A couple changes I made was that the pattern called for plastic eyes. I don't have any, nor did I feel like buying them, "sew" I did my best shot at embroidering them on. Also, I didn't put a mouth on him. I thought he was cute enough without it.
If you don't know what "amigurumi" is, it is basically a small, crocheted, stuffed animal or figurine. They're supposed to be cute. One of the frustrating things about it is all the many little pieces that you eventually have to sew together. Something important for you to remember, even if the pattern doesn't say; if you have little pieces that need to be sewn on (IE. ears, feet, nose, etc), always leave a long tail on the piece after fastening off. That tail will be what you use to sew that piece to the larger whole.
Subscribe to:
Posts (Atom)